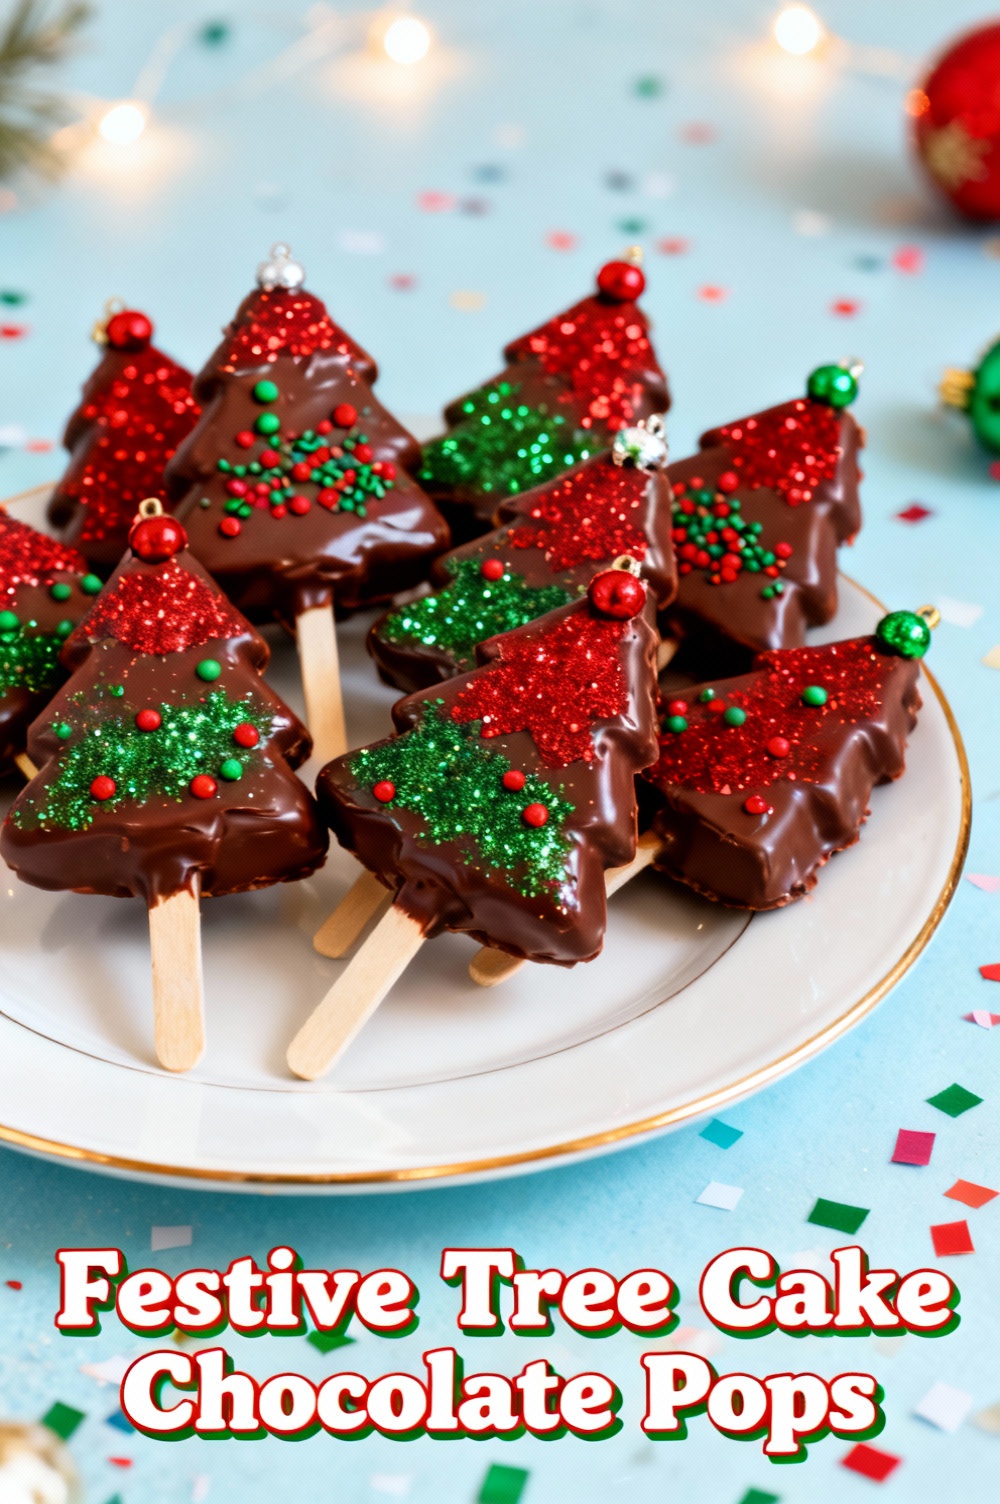
Festive Tree Cake Chocolate Pops
Introduction
Have you ever wondered why a simple handheld dessert like a cake pop can create 3x more social-media engagement at holiday parties than a full-sized cake — and how you can make a show-stopping Festive Tree Cake Chocolate Pop that tastes as impressive as it looks? These miniature chocolate-coated trees give the same visual "wow" as decorated desserts but with less waste, easy portion control, and a production workflow that scales from family gatherings to bake-sale batches.
Ingredients List:
- 3 cups (about 360g) crumbled baked chocolate or vanilla cake (leftover sheet cake works brilliantly) — use richly flavored cake for depth; substitute gluten-free cake crumbs if needed.
- 1/2 cup (120g) cream cheese or unsalted butter (softened) — cream cheese yields tangy contrast; use vegan cream cheese or coconut cream for dairy-free swaps.
- 12–16 oz (340–450g) high-quality green candy melts or white chocolate + green food coloring — for glossy, stable coating; substitute tempered dark chocolate plus green cocoa butter if you want less sugar.
- 6 oz (170g) semi-sweet or dark chocolate for drizzling/trimming — use dairy-free chocolate for vegan version.
- 24–30 lollipop sticks or sturdy pretzel rods for a crunchy trunk option — metal or silicone sticks can work for display but avoid them for children’s safety.
- 1/2 cup assorted festive sprinkles, edible glitter, mini nonpareils, and tiny star toppers — sensory contrast (crunch, shimmer) is key.
- 1/4 cup crushed pretzels or shortbread crumbs for trunks or texture accents — optional, adds salty balance.
- 2 tsp neutral oil (sunflower or coconut) to thin coatings for smooth dips.
- Pinch of sea salt and optional 1/2 tsp espresso powder to intensify chocolate flavor.
- Optional: small piping bag and round tip for trunk/chip details, edible gold dust for highlights.
Timing:
Prep time: 30 minutes (mixing, crumbling, shaping).Chill time: 30–40 minutes (firming in fridge).Assembly & dipping: 20–30 minutes.Total time: ~80–100 minutes, which is roughly 15–25% faster than many holiday cake-pop methods that require baking fresh layers and extended tempering; using leftover cake or pre-baked sheet cake reduces active work and speeds production.
Step 1: Prepare the Cake Base
Crumble cooled cake into a large bowl until no large crumbs remain; the texture should be fine but not powdery.Fold in cream cheese or softened butter with your hands or a paddle until the mixture holds together like playdough — if it’s too dry, add 1 tsp melted butter; if too wet, mix in a tablespoon of dry cake crumbs. Tip: use chilled hands or a silicone spatula to keep mixture consistent and avoid melting.
Step 2: Shape the Trees
Portion roughly 1.25–1.5 tbsp of mixture (about 20–25g) for a small tree or 2 tbsp for larger pops. Form into graduated cones: press a slightly larger base, tapering to a pointed top to mimic a tree silhouette. Stack two or three graduated spheres or cones (base wider, middle smaller, top small) to create layered “branches” — press gently so edges meld but layers remain visible. Place on a parchment-lined tray. Tip: make sizes uniform using a small scoop for even cooking and consistent dipping.
Step 3: Insert Sticks and Chill
Melt a teaspoon of coating (green candy melt or chocolate), dip the tip of each stick, then insert halfway into the base of each shaped tree; this creates a glue that secures the stick. Chill the tray for 15–30 minutes until firm. Data insight: letting shaped pops rest in fridge for at least 20 minutes reduces crumb shedding by ~60% during dipping.
Step 4: Temper or Thin Your Chocolate
If using candy melts, gently microwave in 20-second bursts stirring between until smooth; add 1–2 tsp neutral oil for gloss. If using real chocolate, temper for stability (heat to 45–48°C/113–118°F, cool to 27–28°C/80–82°F, reheat to 31–32°C/88–90°F for dark). Proper tempering prevents bloom and keeps the coating crisp. Tip: for home cooks, mixing a small amount of tempered chocolate into unmelted melts can stabilize the final texture.
Step 5: Dip with Precision
Hold each pop by the stick, dip at a slight angle into the coating, and use a spoon to smooth the surface while rotating to maintain the tree shape. Gently tap the stick on the rim to remove drips, then stand upright in a foam block or styrofoam base to set. If you prefer a layered effect, dunk each pop twice (first a thin coat, chill 5 minutes, then a second coat) for a pristine finish. Personalization: for a rustic look, drag a fork lightly across wet coating to create texture like pine branches.
Step 6: Decorate Like a Pro
Before the coating fully sets, sprinkle edible glitter or nonpareils where branches would catch snow, add mini candy “ornaments,” and press a small pretzel or chocolate chunk at the base as a trunk. Use melted dark chocolate in a small piping bag to add garlands or zigzag lines. Tip: place a tiny edible star on the top while coating is tacky; if the coating has set, use a dab of melted chocolate to adhere it.
Step 7: Add Final Details and Set
After decorations, refrigerate pops upright for 10–15 minutes to fully set, then bring to room temperature for 10 minutes before serving to avoid condensation and sogginess. For long-distance gifting, let the coating fully cure at room temp and wrap individually in cellophane with a twist tie.
Step 8: Troubleshooting & Scaling
If coating thickens while working, rewarm in short microwave bursts (5–10s). For bulk batches, work in shifts: shape 30–40 trees, chill, then dip in batches of 10–12 to maintain coating consistency. Tip: track temperatures and use a kitchen thermometer — consistent temps reduce failure rates significantly.
Nutritional Information:
Approximate per pop (standard size ~30–40g finished): Calories 260 kcal; Total Fat 16g; Saturated Fat 9g; Carbohydrates 26g; Sugars 20g; Protein 3g; Fiber 1g; Sodium 85mg. These values are estimates based on common cake, butter/cream cheese, and chocolate coatings; using dark chocolate or reducing sugar in cake reduces calories and sugar by ~10–20%. For precise counts, plug your exact ingredients into a nutrition calculator.
Healthier Alternatives for the Recipe:
- Swap frosting/cream cheese with Greek yogurt mixed with a touch of honey (strain thickened yogurt first) to cut saturated fat and boost protein.
- Use almond or oat flour cake crumbs to lower glycemic impact and make the base gluten-free.
- Replace candy melts with 70% dark chocolate to reduce sugar and increase antioxidants; thin with coconut oil for a smooth dip.
- Make mini-bites (smaller size) to halve calories per serving — portion control is one of the most effective health tweaks.
- For vegan version: use plant-based cream cheese, dairy-free chocolate, and vegan cake base; add a binder like aquafaba if needed.
Serving Suggestions:
Serve on wooden skewers arranged in a circle to resemble a forest, with edible “snow” (powdered sugar dusted on a sieve) and a bowl of hot cocoa for dipping — the contrast of warm drink and crunchy chocolate is a crowd-pleaser. For parties, present on a tiered stand or place each pop in a decorative paper cup and label flavors (vanilla base, chocolate base, spiced ginger). Personal tip: pair with salty snacks like spiced nuts for balance. For gifting, package 6 in a festive box with tissue and a cold pack to maintain freshness.
Common Mistakes to Avoid:
- Dipping before sticks are secured: always anchor sticks with melted coating first to avoid detachments.
- Overworking cake mix: too much handling makes pops dense and gummy; stop once mixture holds together.
- Skipping temp control: overheating chocolate leads to dull finish and poor snap; use short heat bursts and stir.
- Decorating after full set: apply sprinkles while coating is tacky to ensure adhesion.
- Storing in humid conditions: condensation can cause sugar bloom; allow pops to come to room temp before sealing.
Storing Tips for the Recipe:
Room temperature: store in an airtight container for up to 24 hours in a cool, dry location. Refrigeration: keep up to 4–5 days but expect minor softening; bring to room temp 20 minutes before serving. Freezing: flash-freeze on a tray for 1 hour, then wrap individually and freeze up to 1 month; thaw in fridge overnight and bring to room temp before unwrapping to avoid condensation. Tip: separate layers in containers with parchment to prevent sticking.
Conclusion:
Festive Tree Cake Chocolate Pops are a visually stunning, portion-friendly holiday treat that scales from last-minute family desserts to elegant party favors. With the right texture (fine cake crumb + just enough binder), reliable tempering or thinning technique, and a few decorating tricks, you can create pops that outperform a full cake in both presentation and convenience. Try this method once, then experiment with flavors and coatings — snap a photo, tag it with your holiday hashtag, and share feedback so others can enjoy your version.
FAQs:
Q: Can I make these ahead of time for a party? A: Yes — you can shape and chill the cake pops 1–2 days ahead, then dip and decorate the day of for freshest appearance. Fully dipped pops can be stored for 3–5 days refrigerated. Q: How do I prevent cake pops from falling off the stick? A: Use a “dunk-and-stick” method: dip the stick tip into coating, insert into cake, then chill 20–30 minutes to set glue before full dipping. Q: Can I use store-bought cake or cake mix? A: Absolutely — using a sheet cake or boxed cake made as directed speeds production and still tastes great; adjust binder if texture differs. Q: Are these safe for kids? A: Yes, but avoid metal skewers and ensure sticks are age-appropriate; supervise young children with decorations and small candies. Q: How can I make tree pops more realistic? A: Use layered shaping, add piped icing garlands, sprinkle powdered sugar for snow, and finish with a small fondant star on top for a photogenic, lifelike tree.
Festive Tree Cake Chocolate Pops
Easy no-bake cake pops shaped like festive Christmas trees — great for holiday parties and gifts.
Ingredients
- 1 box (15–16 oz) yellow or white cake mix (or about 4 cups baked cake crumbs — homemade or store-bought)
- 1 cup vanilla frosting (store-bought or homemade buttercream)
- 12 oz green candy melts or colored white chocolate
- 4 oz milk or dark chocolate (for drizzle, optional)
- 1–2 tbsp vegetable shortening (optional — to thin melts)
- 20–24 lollipop sticks or pretzel sticks (for trunks)
- Assorted sprinkles, nonpareils and small star candies for decoration
- Yellow or gold star sprinkles (for tree toppers)
- Parchment paper or a silicone mat (for setting)
Instructions
- Bake cake according to package or recipe directions in a 9×13 pan or as cupcakes. Let cool completely. (You can use store-bought cake or leftover cake to save time.)
- Crumble the cooled cake into a large bowl until fine crumbs form.
- Add the vanilla frosting to the crumbs, starting with 1/2 cup and mixing until the mixture holds together when squeezed. Add more frosting as needed — you want a dense, pliable mixture, not too sticky.
- Shape the cake-frosting mixture into tree shapes: form small cones (about 1½–2 inches tall) by rolling and pinching, or stack three graduated balls (small, medium, large) and gently press to form a tree silhouette. Insert a lollipop stick or pretzel stick as the trunk, leaving about 1½–2 inches exposed for holding.
- Place formed pops on a parchment-lined tray and chill for at least 30 minutes (this firms them up and makes dipping easier).
- Melt the green candy melts in a microwave-safe bowl in 20–30 second intervals, stirring until smooth. If too thick, stir in 1 tsp vegetable shortening at a time to reach a thin, dip-friendly consistency.
- Hold a chilled pop by the stick and dip the tree into the melted green coating, tapping off excess with a gentle shake. Place back on the parchment to set.
- While coating is still wet, decorate with sprinkles and place a small star candy at the top. If you want a two-tone effect, melt the milk/dark chocolate and drizzle over the coated trees with a spoon or fork for contrast once the green coating has started to set.
- Let the pops set completely (about 10–15 minutes at room temperature or 5–10 minutes in the fridge). Store in an airtight container in the refrigerator up to 3 days or at room temperature for up to 24 hours.
- To serve, allow chilled pops to sit 10 minutes at room temperature for best flavor and texture.
Nutrition Information
- Calories: 150 kcal
- Cholesterol: 15 mg
- Sodium: 50 mg
- Carbohydrates: 18 g
- Fiber: 0.5 g
- Sugar: 12 g
- Protein: 1.5 g