Little Debbie Snowball Truffles
Could transforming the nostalgic Little Debbie Snowball into bite-sized truffles deliver the same fluffy marshmallow-and-coconut experience in under 60 minutes while matching modern preferences for shareable, no-bake desserts?
Ingredients List
- 12 store-bought Little Debbie Snowballs (or 10–12 small chocolate-coconut snack cakes) — finely crumbled for texture and authentic flavor. Substitute: use any chocolate snack cake or homemade chocolate cake crumbs.
- 4 oz (115 g) cream cheese, softened — binds crumbs and adds tang. Substitute: mascarpone for richer taste or plain Greek yogurt (strained) for lighter calories.
- 1/2 cup (60 g) powdered sugar, sifted — sweetens and firms truffle centers. Substitute: coconut sugar powder or erythritol powdered blend for reduced sugar.
- 1/2 tsp pure vanilla extract — enhances the Snowball profile. Substitute: a drop of rum extract for adult twists.
- 8 oz (225 g) semi-sweet chocolate or chocolate chips for coating — use milk chocolate for a closer match to the original. Substitute: dark chocolate (60–70%) for less sweetness, or compound coating for faster melt.
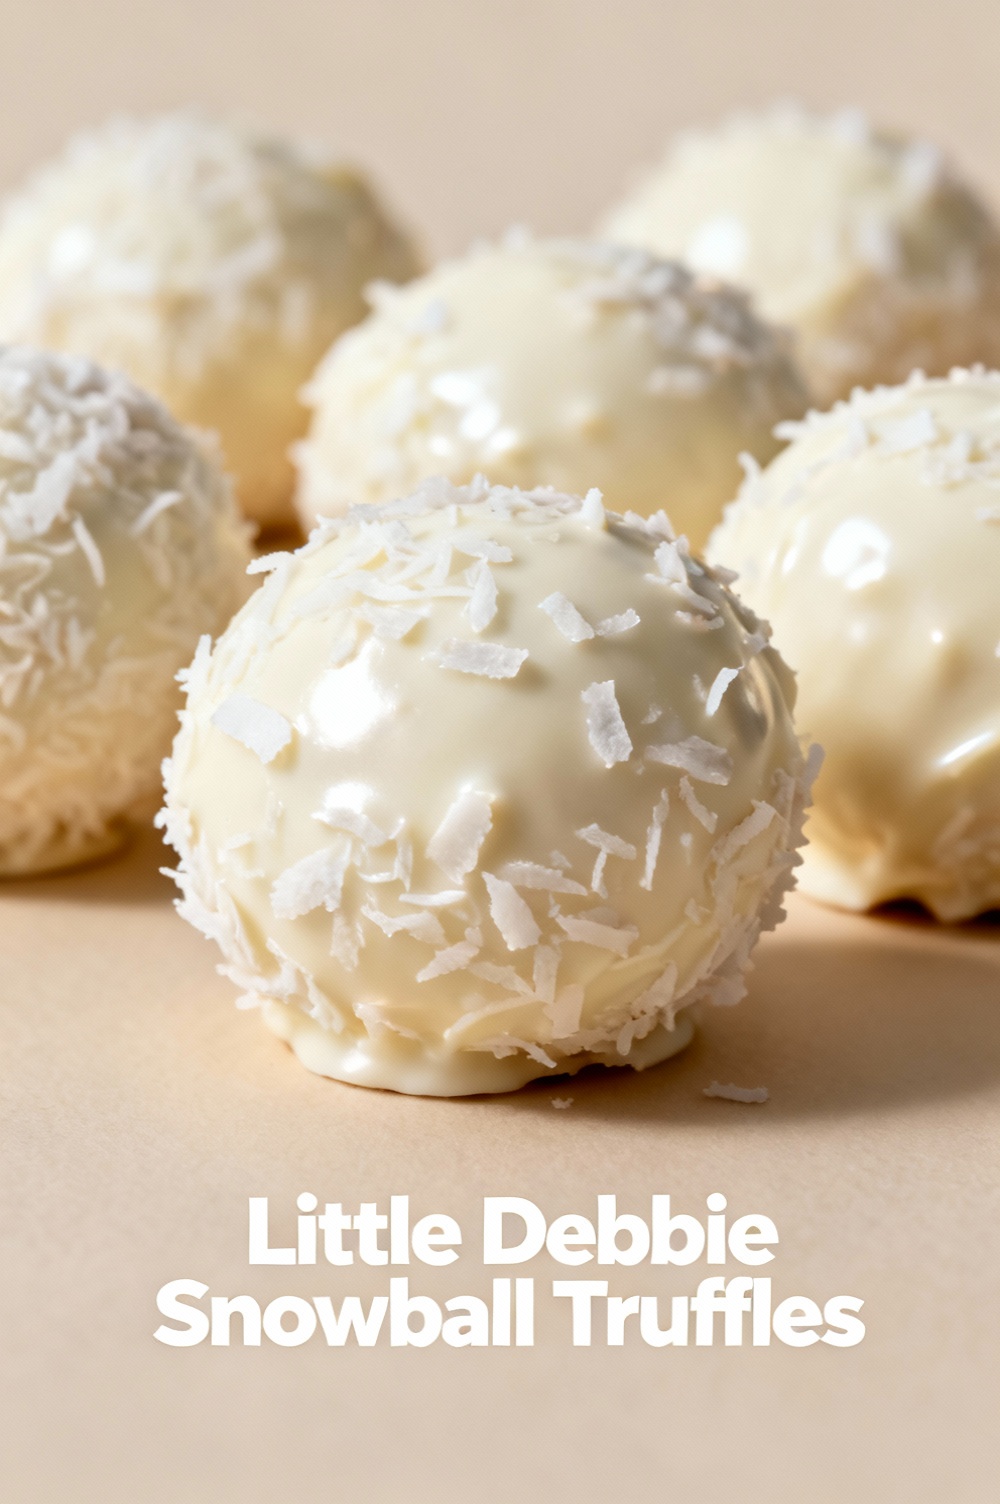
- 3/4 to 1 cup sweetened shredded coconut — to finish and mimic the Snowball exterior. Substitute: unsweetened coconut toasted for nuttier flavor or finely shredded white chocolate shavings for a smoother look.
- Optional: 1 tbsp coconut oil (to thin chocolate for shiny dip), flaky sea salt for finishing, 1/4 cup marshmallow creme for extra gooey centers.
Timing
Prep time: 20 minutes; Chill time: 30 minutes; Coating and finishing: 10–15 minutes; Total time: ~60–65 minutes. This no-bake approach is typically 30–50% faster than baking a from-scratch cake-and-frosting ball conversion and fits well into an hour-long dessert plan for gatherings or last-minute treats.
Step-by-Step Instructions
Step 1 — Prepare the Snowball base
Place Snowballs in a large bowl and use a fork or food processor to crumble them to fine, even crumbs. Aim for a sandy texture with some small pea-sized bits for mouthfeel. Tip: Pulse in a food processor in 5–6 short bursts to avoid a paste; you want enough texture so truffles don’t taste too dense.
Step 2 — Mix binder and flavor
In a separate bowl, beat softened cream cheese until smooth, then mix in powdered sugar and vanilla (and marshmallow creme if using). Fold the cake crumbs into the cream cheese mixture until evenly combined. The ideal consistency is malleable but not sticky — it should hold shape when rolled into a ball. Tip: If mixture is too wet, add a tablespoon of crumbs at a time; if too dry, a teaspoon of milk or a touch more cream cheese will help.
Step 3 — Portion and chill
Use a small cookie scoop (1 tablespoon) or a teaspoon to portion uniform balls. Roll between palms for even shape. Arrange on a parchment-lined tray and freeze or chill in the fridge for 20–30 minutes until firm. Insight: Chilling firms the centers and prevents cracking when dipping; professional chocolatiers always chill centers before coating.
Step 4 — Prepare chocolate coating
Melt chocolate gently using a double boiler or microwave in 20–30 second bursts, stirring between intervals. If needed, add 1 teaspoon of coconut oil to thin and create a glossy shell. Tempering yield: you don’t need perfect tempering for home truffles, but avoid overheating (keep under 115°F/46°C for dark chocolate, lower for milk). Tip: Use a fork or dipping tool for cleaner coating and less excess chocolate.
Step 5 — Dip and finish
Using a fork, dip chilled truffle into melted chocolate to fully coat, lift, tap off excess, then immediately roll in shredded coconut while chocolate is still wet so it adheres. Place back on parchment to set. For a snowy look, apply another light sprinkle of coconut right after setting. Pro tip: If coconut doesn’t stick well, press gently with a fingertip or use a small offset spatula.
Step 6 — Rest and serve
Allow dipped truffles to set at room temperature or speed up by refrigerating for 10–15 minutes. For best texture, let truffles sit 10 minutes at room temperature before serving so the centers soften slightly. Personalized tip: For a glossy professional finish, chill briefly then bring to room temperature before plating.
Nutritional Information
Estimated per truffle (makes ~24 truffles, 1 truffle ≈ 20–25 g): Calories ~140–170 kcal; Fat ~8–10 g (saturated fat ~4–6 g); Carbohydrates ~16–20 g (sugar ~10–13 g); Protein ~1.5–2 g; Fiber ~0.5–1 g. Data insight: because these are made from snack cakes and chocolate coatings, each truffle has a dessert-density similar to small confectionery bites — plan portions accordingly (2 truffles ≈ small dessert serving). To calculate precise macros, weigh final yield and use ingredient labels or a nutrition calculator.
Healthier Alternatives for the Recipe
- Lower sugar: Replace powdered sugar with monk fruit powdered mix or reduce amount by 25%; use unsweetened coconut and dark chocolate (70%+) to cut sugar further.
- Lower fat: Swap half the cream cheese for 2 tbsp plain Greek yogurt (full-fat recommended for texture). Use a light coating technique (thin chocolate) or choose a couverture alternative with less saturated fat.
- Allergy-friendly: For dairy-free, use full-fat coconut cream or vegan cream cheese and dairy-free chocolate. For gluten-free, use certified gluten-free chocolate snack cakes or homemade gluten-free chocolate cake crumbs.
- Protein boost: Add 1–2 tbsp unflavored whey or plant protein to the binder; increase powdered sweetener slightly to balance texture.
Creative spin: Make a “marshmallow-forward” center by folding in 2–3 tbsp marshmallow fluff for a chewier mouthfeel and closer match to original Snowball interior.
Serving Suggestions
Serve on a small dessert platter dusted with extra coconut and edible gold flakes for parties. Pair with:
- Coffee or espresso for contrast (bittersweet chocolate pairs well with bright coffee notes).
- Sparkling wine or rosé for celebrations — the effervescence balances sweetness.
- Mini dessert boxes for gifts — include 6 truffles per box with parchment separators.
Personalized serving idea: For a kids’ party, place truffles in paper candy cups and label as “Snowball Bites” with small flags showing flavors (classic, dark chocolate, toasted coconut).
Common Mistakes to Avoid
- Overprocessing crumbs into paste — results in gummy centers. Fix: Add more crumbs or chill to firm.
- Dipping warm centers — causes chocolate to crack or slide off. Fix: Chill centers thoroughly before dipping.
- Overheating chocolate — leads to grainy, dull coating. Fix: Melt slowly and stir; add small amount of neutral oil to smooth if needed.
- Using wet coconut — always pat dry or toast lightly; moisture can make the coating slip.
- Inconsistent portion sizes — leads to uneven setting and serving. Fix: use a small scoop for uniformity and consistent chill times.
Storing Tips for the Recipe
Store truffles in an airtight container in the refrigerator for up to 10 days. For longer storage, freeze in a single layer on parchment for 1 hour, then transfer to a freezer-safe container separated by parchment — freeze up to 2 months. Thaw in the refrigerator overnight and bring to room temperature before serving to restore ideal texture. Best practice: avoid leaving truffles at warm room temperatures for extended periods (chocolate may bloom or coconut may dry out).
Conclusion
This Little Debbie Snowball Truffles recipe captures the nostalgic marshmallow-coconut charm in a shareable, no-bake format that’s perfect for parties, gifts, or a weekend treat. Key takeaways: use crushed Snowballs for signature flavor, chill centers before coating to ensure smooth shells, and personalize coating choices for dietary needs. Try the recipe this week — make a batch, post a photo, and tag your preferred platform or comment below with your flavor twist so others can try it too.
FAQs
Q: Can I make these without Little Debbie Snowballs?
A: Yes — use any chocolate snack cake, pound cake, or leftover chocolate sheet cake. Adjust sweetness and crumbs to taste.
Q: How do I prevent the coconut from turning brown?
A: Keep coconut away from direct sunlight and store finished truffles in the fridge. If toasting coconut, toast briefly and watch closely; it should be golden, not dark.
Q: Can I freeze the truffles and re-coat later?
A: You can freeze coated truffles for up to 2 months. For best texture, freeze uncoated centers then dip after partial thaw; fully thawed centers can be softer and harder to coat.
Q: What’s the best chocolate for dipping?
A: For closest match to Little Debbie, use milk chocolate or a balanced semi-sweet. For less sweetness choose 60–70% dark. Add a small amount of coconut oil to improve sheen and flow.
Q: How many truffles does this recipe make?
A: Yield depends on size. Using a tablespoon scoop you’ll get roughly 20–24 truffles. Scale ingredients proportionally for larger batches.
Explore related recipes: try “Snowball Blondie Bites,” “homemade coconut truffles,” or a “copycat Little Debbie Fudge Round truffle” to expand your dessert table and play with the same flavor family.
Little Debbie Snowball Truffles
A no‑bake truffle twist on the classic Little Debbie Snowball — creamy cake mixed with cream cheese, dipped in chocolate and finished with shredded coconut.
Ingredients
- 10 Little Debbie Snowball cakes (about one standard sleeve)
- 4 oz (115 g) cream cheese, softened
- 8 oz (225 g) semi‑sweet or dark chocolate chips
- 1 tsp coconut oil or neutral oil (optional, for smoother chocolate)
- 3/4 cup (about 60 g) shredded sweetened coconut, divided (½ cup for mixing, ¼ cup for coating)
- Parchment paper or a silicone mat, for setting
Instructions
- Place the Little Debbie Snowball cakes in a food processor and pulse until fine crumbs form. Alternatively, place in a large zip-top bag and crush with a rolling pin.
- Transfer the crumbs to a bowl. Add the softened cream cheese and ½ cup of the shredded coconut. Mix (or pulse briefly in the food processor) until a smooth, moldable dough forms.
- Using a small cookie scoop or a tablespoon, scoop portions of the mixture and roll between your palms to form 1‑inch to 1¼‑inch balls. Place the formed truffles on a parchment-lined baking sheet.
- Chill the truffles in the refrigerator for 30–60 minutes, until firm.
- While truffles chill, melt the chocolate: place chocolate chips and coconut oil (if using) in a microwave-safe bowl and microwave in 20–30 second intervals, stirring between, until fully melted and smooth. Alternatively, melt over a double boiler.
- Remove truffles from the fridge. Using a fork or dipping tool, dip each truffle into the melted chocolate, letting excess drip off, then place back on the parchment.
- Immediately sprinkle or press the remaining shredded coconut onto the chocolate-coated truffles (while chocolate is still wet) so the coconut adheres.
- Return the coated truffles to the refrigerator for another 20–30 minutes to set. Store in an airtight container in the fridge for up to 1 week.
Nutrition Information
- Calories: 150 kcal (per truffle, approximate)
- Cholesterol: 25 mg
- Sodium: 75 mg
- Carbohydrates: 14 g
- Fiber: 1 g
- Sugar: 11 g
- Protein: 2 g